FourierSynth
FourierSynth
is a Fourier analyzer for sounds. It is primarily useful for
demonstrating , both visually and aurally, the effects of adding together
Fourier modes. It also records from the sound card. and can Fourier analyze
a segment of the recorded sound.
Get the latest version of FourierSynth 0.55 from Here
Requirements
Linux Operating system with the XForms library, available from
www.theory.physics.ubc.ca/xforms-libs.tar or
from
world.std.com/~xforms/.
You just need the library, libforms. I used version .89 in developing
this.
A 16 bit soundcard supporting the /dev/dsp port on Linux (Eg, a
Soundblaster 16 compatible cardi with the OSS driver support installed).
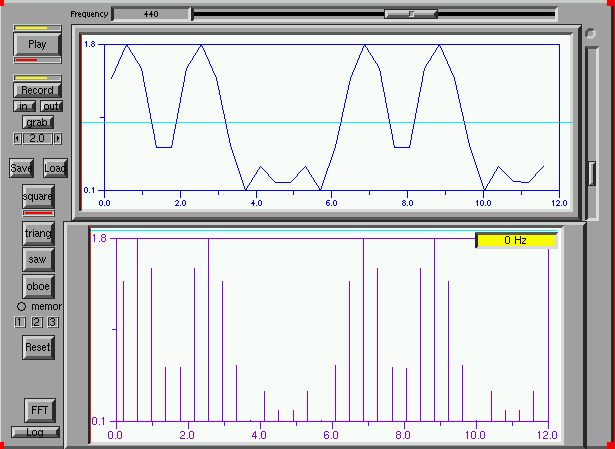
The Layout of the Synth window
Click on the regions of the following image to find what that item of
the Synth window does.

The following is a description of the various buttons, sliders,... on
the FourierSynth window.
Left Hand Edge --Top to Bottom
Play
This button plays the sound through the sound card. It uses the OssDsp
(/dev/dsp) sound driver on Linux. It takes the currently displayed spectrum,
and plays it. It is controlled by two sliders. The yellow slider above
the Play button controls the length of time the sound sounds, from .1 sec
to 2 sec. The red slider below the Play button controls the amplitude of
the played sound.
Record
This button controls the recording of sound from the /dev/dsp driver for
the sound card. It has three states. The first, with the button a grey
colour, designates that recording is off. The second, with the colour green,
designates either that the system is ready to record, and, if there is
a previously recorded session, it displays that session and allows the
zooming in and grabbing of a segment of the previously recorded sound.
(see the In, Out, and Grab buttons below). The third state, when the colour
is yellow, indicates that recording is taking place. The sound recorded
is displayed on the graph window to the right. The final state, with the
button coloured red, indicates that the recording has stopped, and that
the sound file can be zoomed in or out or grabbed.
The yellow slider above the Play button sets the length of time the
recording will last.
Zoom buttons--In Out
These two buttons allow you to zoom in on a section of the recording, or
zoom out to the previous level. The section to be zoomed in on is indicated
by using the cursor to mark ( by clicking on the graph of the sound input)
a section of the sound. The places clicked is marked by vertical red lines.
Only the last two clicks are displayed. To zoom in, there must be two separate
markers on the graph.
Cycles counter
This counter (possible values from 1 to 5) indicates how many cycles of
the sound are displayed on the graph at the right when the sound input
is grabbed. The display must contain a number of cycles from 1 to 5, and
this counter must agree with that number for the grabbed spectrum to be
an accurate reflection of the periodic sound.
Grab
This button is to take in a full screen display from the recording, and
Fourier analyze it and display that Fourier analysis on the sliders below
the graph. This spectrum can then be remembered into one of the three memory
locations (Memory button), or can be written out to a file (Save button).
Save
This button is to save the currently displayed spectrum as recorded on
the Amplitude and Phase sliders into a file. When this button is pressed,
When this button is pressed, a window opens into which the name of the file in which to save the current
spectrum can be entered. Type in the file name and press return.
If there
is some problem in writing the file (e.g., cannot create or open the file
for writing) a popup box with the words "Cannot Open File" will appear.
Click on the OK button to dismiss.
Load
This button is to load a previously saved file of the amplitudes and phase
of a spectrum. The format of the file must be that the first line contain
a comment ( which is ignored). The next 30 lines contain two numbers each,
representing the amplitude and phase of that particular Fourier component.
There must be thirty lines, and each must contain two numbers.
When the Load button is pressed, the same filename request as
described underthe Save button is presented.
Square Triangle Saw Oboe
These four buttons contain four different predefined spectra. The Square
contains the Fourier components of a square wave. The small red slider
beneath this button determines the duty cycle of the square wave, from
0 (no signal) to 50% (the standard square wave).
The Triangle wave generates the Fourier components of an ideal triangle
wave, while the Saw generates those of a Saw toothed wave.
Finally, the Oboe generates a wave with a few low mode number waves,
and a few high mode waves. (It is not the recording of any real oboe).
Memory
The Memory button has two states. In the grey state, the three buttons
below will display their respective spectra if pushed. If the Memory button
is lit (green coloured), then pushing one of the three coloured buttons
will place the currently displayed spectrum into that memory location.
Numbered Buttons
These three buttons represent the memory cells of the Synth program. If
the buttons are flat, then they contain no remembered spectrum and are
inactive. To record a spectrum into one of these memory locations, press
the Memory button (so it is lit) and then press one of these buttons. It
will change from flat to a raised button. To display the contents of the
memory location, press the raised button, with the Memory button unlit.
(If the memory button is lit, the new currently displayed spectrum will
overwrite the contents of the memory location).
Reset
This button resets the amplitudes and phases all to zero.
FFT
This button which is only active during recording (ie while the recording button
is green or red) overlays the bottom of the screen with a new window, which is
the Fast Fourier Transform of the recorded data displayed in the top graph. It
uses a square window, which consists only of the data displayed in the top of
the screen. Because of aliasing, if the data in the top of the screen has many
wavelengths, high frequencies in the recorded data may create low frequency
artifacts in the FFT window.
See below for a more detailed description of this
window.
Center Of Display
Frequency
This slider determines the frequency at which the Play button plays the
displayed selection. It spans three octaves from 82.5 Hz(E2) to 660Hz(E5).
When a selection is grabbed during recording, this frequency is automatically set using the cycles counter and the time span represented by the full frame of the grabbed window.
Display
This top white section of the screen is where the graph is displayed which
corresponds to the spectrum set on the sliders below. Two cycles of the
periodic signal corresponding to the spectrum are displayed.
With certain settings of the play volume slider and the Display
Magnification slider, two red lines appear on the left edge of the Display.
These represent the clipping levels for playback. If the sound exceeds these,
the sound will be clipped, and very badly distorted on playback. If the two red
lines do not show, then the clipping level is off the top or bottom of the
screen.If the Play Display Magnification Button is
pressed, the clipping level is always at least a factor of two larger than the
top or botton of the display.
Note that when the system is in recording mode, the sound recorded from
the sound card is displayed here. The cursor can in this case be used to
mark a section of the displayed sound by clicking with the mouse when the
mouse if located on the recorded sound. Note that due to a bug in Xforms,
the marked location will not be exactly where the mouse cursor is located,
but will be a few (variable) number of pixels to the left.
In recording mode, the times from the start of the recording of the
left and right hand edges of the display are recorded at the bottom of
the screen. These are roughly in seconds. Also recorded is the Frequency
which that a period corresponding to that full screen would correspond
to. (It is just the reciprocal of the difference in the two displayed times)
Play Display Magnification Button
This button when lit (light green) amplifies the playback to correspond also to
the display magnification. Ie, both the Display Magnification and the Play
volume slider under the Play button determine the amplitude of the output sound.
Display Magnification Slider
To the right of Display screen is a slider which controls the magnification
of the display. It is a logarithmic scale, going from and amplification
of 1/8 at the bottom position of the slider, to 64 at the top position.
The setting of this slider also affect the amplitude of the sound played
by the Play button. I.e., one can control the amplitude both with this
Display slider, and with the small yellow slider just above the Play button.
Grab Warning
It is a common mistake to mark a recorded section of the recorded sound, and
then forget to zoom in on it befor grabbing. If there are two red zoom cursors
displayed on the screen when you attempt to grab, this warning will come up. You
can either hit Cancel, and the grab will be aborted (no sound will be taken into
the system) or if you hit OK, the grab will proceed, ignoring the red cursors.
(Ie, as usual, the whole of the screen will be taken to be the grab region, not the
region between the cursors.)
This warning will also be displayed if you try to grab the whole of the
intial recorded sound (ie without having zoomed in at all).
Amplitude Sliders.
Arrayed below the Display are 30 sliders which correspond to the Fourier
amplitudes of the signal displayed on the screen. These amplitudes go from
0 to 1, and can be adjusted by dragging the slider with the mouse, (i.e.
positioning the mouse cursor over the slider, and dragging the mouse while
holding down one of the mouse buttons). The screen will display the effect
that increasing or decreasing that component has on the resultant graph.
Amplitude Magnification Slider
To the right of the 30 Amplitude sliders is a slider which controls the
amplification of the Amplitude slider display. Usually the sliders have
a range from 0 to 1.0. With this slider moved toward the top of its range,
the Amplitude sliders range is changed from 0 to 0 to a range from 0 to
some smaller value. With the Magnification slider at the top of its range,
the Amplitude sliders instead have a range from 0 to 0.1. This does not
change the value of any of the Amplitude sliders, just the display. It
resets to zero when any other button or slider is adjusted.
This slider is most useful when examining the spectrum of some recorded
sound. This allows you to magnify the low amplitude Fourier components.
Component Display Limit
The long horizontal green slider beneath the Amplitude sliders designates
which of the Fourier components will be added together in making the display.
With the right edge of this slider under the component number 6 say, only
the first six Fourier amplitudes will be summed together to create the
display or to make the sound produced when the Play button is pressed.
PhaseSliders
These sliders alter the phase of the Fourier components, from 0, when the
slider is down, to 360 degrees when it is at the top. The Fourier component
displayed is cos(x+P) where P is the phase. These allow you to demonstrate
the effects of changes of the phase on the appearance of the wave, and
also demonstrate that such phase changes make no difference to the sound
produced.
FFT Window
In adition to opening the new window, an extra button also appears under the FFT
button ( which is renamed the Cancel FFT button). This button labeled either
Linear or Log changes the FFT display from linear frequency scale (if the Log
button is pressed) or from log to linear (if the Linear button is pressed).
If the mouse is placed over the fft display, and the left mouse button is
pressed, a cursor line appears, together with a small yellow frequency display
in the top left hand corner of the fft window announcing the frequency of the
cursor line.
FFT Aliasing
As an example of the effects of aliasing on the fft, I present four examples of
fftp displays of the same data on various levels of zoom. These were a recording
of my voice.
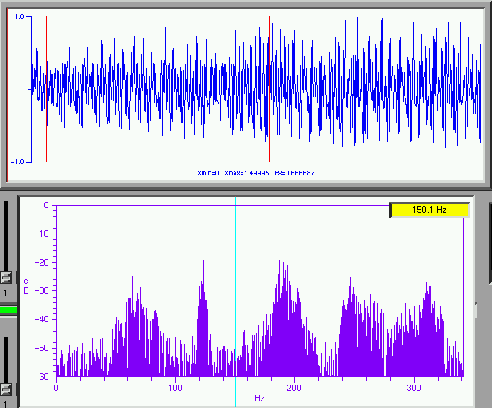
In the first example, in which the full screen of approximately 1.5 sec of
recording are fourier transformed, we see strong evidence of data at about 60
Hs, and also at multiples thereof. Most of this is aliasing, the representation
of data of frequencies higher than about 350 Hz ( the limit of the display--
512(the fourier transform is a 1024 point transform) times the fundamental
frequency of the display, or .66 Hz).
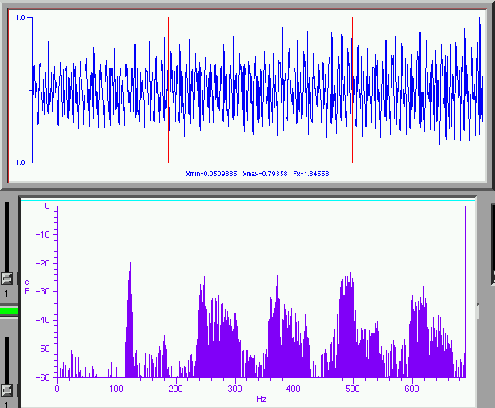
We note that when we zoom in on the region
between the two red linesin the first figure, the frequency scale expands, (to
about 700Hz) and the whole mess of data below 100Hz has disappeared. Note that
the widths of the peaks around 250, 375,500 are still probably due to some
aliasing from strength in the spectrum beyond 700Hz
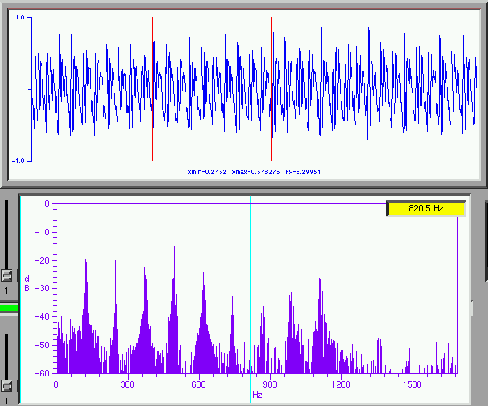
Expanding again to zoom in of the region between the two red lines in the
previous figure, we expand the frequencies to about 1600Hz, but of course at the
expense of having taken the transform of only a more limited region of the data.
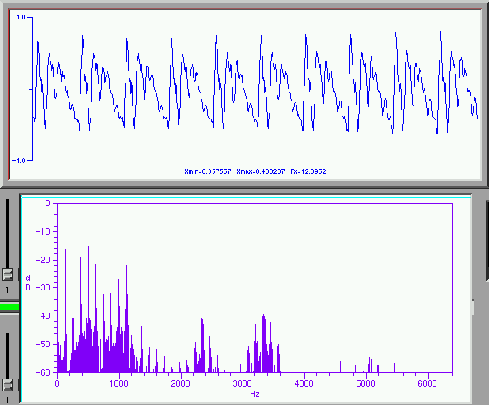
A final expansion on a limited part of the previous figure shows that there
is little energy in the spectrum beyond about 4000Hz.
The Synch program and this web page are copyright
W. Unruh,  . They may both be
freely copied and distributed as long as this copyright notice is
maintained.
. They may both be
freely copied and distributed as long as this copyright notice is
maintained.
This program was designed using
XForms
and requires the Xforms library to run. This may be obtained from the above
site.
This program also uses parts (the Oss Dsp drivers) of the
Sox (SOund eXchange)
program to impliment the sound input and output routines.